Developing the rendering tech for Double Fine’s Costume Quest 2 was challenging because the game was developed by a small team in less than a year. It was even more challenging because it was released nearly simultaneously on eight platforms: PS4, XBox One, PS3, XBox 360, WiiU, Windows, OSX, and Linux. It used Double Fine’s proprietary game engine, named Buddha.
Much of the engineering schedule for Costume Quest 2 (CQ2) was taken up with resurrecting support for the old consoles and and bringing up the engine on new consoles. At the beginning of development, Buddha was running only on Windows, and with a bit of fixing up, also on OSX and Linux. The 360 and PS3 builds had suffered heavily bit rot, and the WiiU port had never been integrated back to our main codebase. Finally, the Buddha engine wasn’t 64-bit, much less running on XBOne or PS4.
As a result, little programming time was left for look development in preproduction. On the plus side, CQ2 was a sequel, so the game’s art style was a known quantity. Nevertheless, the CQ2 design was more ambitious than the original Costume Quest, including levels in a swampy bayou in New Orleans and a dystopic future where you have to save Halloween from an evil time-traveling dentist.
We knew we could use the old graphics tech from the original game, but of course, we wanted to improve on the past and do better. We also had the difficult constraint of having to scale from last gen consoles all the way up to modern consoles and desktop PC’s. So… let’s roll up our sleeves and get to it!
Physically Based Rendering
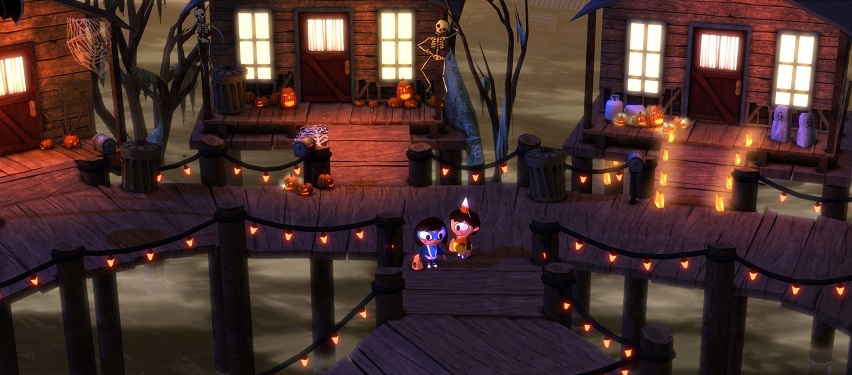
Costume Quest’s aesthetics are inspired more by a comic book art style than the physical constraints of the real world, so you might be wondering how physically based rendering applies to CQ2. Actually, the game has two separate styles of rendering; the first is for the toon-shaded characters, and the second is for the more traditionally rendered world.
The first style of rendering is for the characters, which use a toon shader and a cel outline effect. That shading is not even vaguely physically based; if we had more graphics dev time on CQ2, I would have looked into developing an energy conserving toon shader effect. Instead, the toon shader is a simple 1D lookup texture based on the NdotL of a single light direction. That’s also the same effect that was used in the original Costume Quest.
The second style of rendering is for the rest of the world, which uses an energy conserving Blinn-Phong BRDF lit by a primary shadow-casting sunlight, additional point lights, and a hemisphere light for ambient lighting. All lighting was dynamic, except for prebaked per-vertex ambient occlusion. The Blinn Phong BRDF was based on Tri-Ace’s work. We dropped the Fresnel factor, which doesn’t match the real world but doesn’t break energy conservation. The Fresnel effect didn’t fit the art style, and it was a bit cheaper to drop the calculation.
Here you can see the toon-shaded characters along with a nice specular highlight on the ground:

There are two aspects of physically based rendering which are very useful even for games that use nonphotorealistic materials. One aspect is energy conservation, meaning that a surface emits no more light than it receives. This is important because you want materials that work independently of the lighting environment and avoid the production problem of reworking materials after you do a lighting pass and vice versa. When renderers don’t obey energy conservation, such as with unnormalized Blinn-Phong, you often have to manually adjust the specular color, gloss, and perhaps other ad-hoc factors whenever the lighting changes. Another useful aspect of physically based rendering is that it produces more consistent results by following a few constraints. The number and range of material attributes is better defined, which helped us reason about about which values were important to Costume Quest 2 and how best to pack them into a deferred renderer’s gbuffer.
CQ2 strayed from realism in many ways but kept those two aspects of physically based rendering. For instance:
- We removed support for metallic materials. There’s no support for a specular color vector; instead, there’s a specular intensity scalar value. This was done to fit into the small gbuffer, and there are few metals in the CQ2 universe.
- Even though everything is shiny in the real world, many of the materials are purely diffuse with a specular intensity value of 0.0.
- We removed the Fresnel effect, which doesn’t match the real world, but isn’t necessary for energy conservation. The effect looked out of place with CQ2’s aesthetics and was slightly cheaper to compute.
- Our point lights used a color inside an inner radius and a different color inside an outer radius, which isn’t possible in the real world, but the important aspect of energy conservation (basically, that the light exiting a surface is less than or equal to the light illuminating the surface) was still maintained.
Deferred Rendering
We faced many constraints when targeting so many platforms. We knew we wanted to support a large number of lights, so a deferred renderer of some kind made sense. We wanted to use as much of the same rendering code as possible on all of the platforms, because we didn’t have time in the schedule to carefully tune our renderer for every target. However, various platforms limited our options in different ways: the XBox 360 has just 10 MB of EDRAM, the PS3’s RSX has relatively low bandwidth to memory, and of course even the XBoxOne has 32 MB of ESRAM (although that machine is much more flexible than older consoles). We chose a gbuffer format of two RGBA8888 render targets (plus the depth buffer) to fit in EDRAM and run well everywhere. This fit neatly into the 360’s EDRAM (where we render at 1200x720) and also fits into the 32 MB ESRAM of the XBox One (where we render at 1920x1080).
One of the advantages of physically based rendering, as I mentioned above, is that materials produce more consistent results by following a few constraints. Most materials are either metallic or dielectrics, and with some simplification, the constraints can be summarized as this:
- Non-metals (dielectrics) have an albedo color and monochromatic specular in the range (0.02, 0.08)
- Metals have no albedo color and a specular color value in (0.5, 1.0)
A minimal Blinn-Phong BRDF will use an albedo color, specular color, gloss scalar, and normal vector. That’s 10 components, which would be tricky to fit into the smaller gbuffer format. CQ2 additionally needed to store ambient occlusion and emissive values in the gbuffer, making it even more difficult to fit.
The paper Physically Based Shading at Disney is interesting because it takes advantage of the constraints of physically based materials. They use a metallic texture to indicate whether a material is a dielectric or metal; in the case of a dielectric, they use the albedo color directly along with a scalar specular intensity, and for metals, they repurpose the albedo color as the specular color and use an all-black albedo for lighting. A similar technique is also used by Unreal 4. The metallic value helps a lot with packing values into a gbuffer because you no longer need to store a specular color in 3 components. A possible gbuffer layout would look like this:
albedo R         | albedo G        | albedo B        | metal
normal X         | normal Y        | spec. intensity | gloss
That’s close to what we want with Costume Quest 2, but we have nowhere to put the ambient occlusion and emissive value. As mentioned above, we decided to drop support for metallic materials. We don’t need the metal component, but it’s also useful to remember the specular intensity for dielectrics is in the range [0.0,0.1] and doesn’t need much precision. We pack the specular intensity with the emissive, and place the ambient occlusion into a separate channel.
That gets us to the layout we used for CQ2:
albedo R         | albedo G        | albedo B                   | ambient occlusion
normal X         | normal Y        | spec. intensity / emissive | gloss / cel shaded
In this screenshot, you can see debug visualizations of unpacked data in the gbuffer. Clockwise from top left, they are albedo, normal, specular intensity, roughness, ambient occlusion, and emissive.
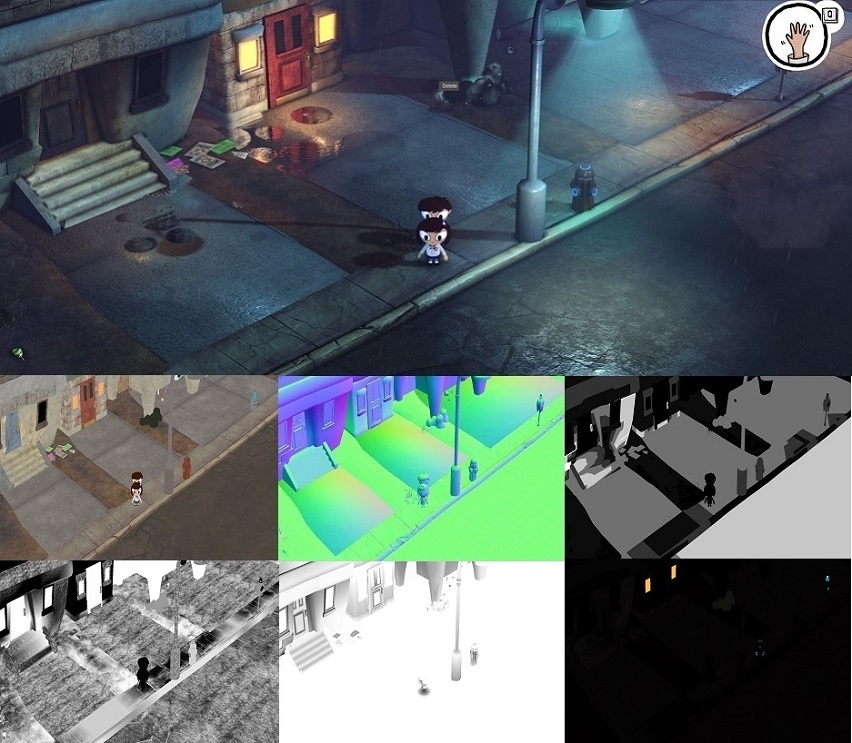
The albedo had to be stored in gamma space as this was an eight bit per channel format. Our pipeline is gamma correct, meaning it does all lighting and blending in linear space, so we had to be sure to convert the albedo colors to sRGB before we wrote them to the framebuffer. Not all platforms had support for per-render-target sRGB writes, so this was done manually.
Normals were stored in view space.
The ambient occlusion stored the per-vertex AO. This needed to be in its own channel (not packed with anything else) because screen-space ambient occlusion blended with this value. Additionally, the character drop shadows would blend with the ambient occlusion channel.
The specular intensity and emissive were packed together using four bits each. The specular intensity represented a value in the range [0, 0.1], and the emissive was in the range [0, 8]. In the lighting composition pass, the emissive value multiplied with the albedo color and added to the final lit color. It would have been nice to have a separate emissive color, but there was no room in the gbuffer.
The gloss (AKA roughness, or smoothness) was in the range [0, 2048] and stored in 7 bits. The top bit stored the cel shaded bit.
Future
It would have been interesting to squeeze more out of the gbuffer by encoding albedo in YCoCg as discussed in The Compact YCoCg Framebuffer.
The popular GGX shading function can be evaluated pretty cheaply; you can read more about that at Optimizing GGX Shaders with dot(L,H).
Future projects will have different constraints and target more modern hardware, but I wanted to share what worked well for Costume Quest 2.